How To Make Concrete Look Like Brick (DIY Guide)
Transform concrete into authentic-looking brick using 5 proven techniques. Choose from painting methods or permanent stamping based on your project needs.
Concrete can look exactly like brick using stencils, stamps, or texture rollers - achieving the same visual impact at 60% less cost than real brick installation.
The key is choosing the right technique for your situation. Paint-based methods work on existing concrete and cost under $100 for most projects. Stamping techniques require fresh concrete but create permanent, textured results that last decades.
This guide covers all five proven methods, from beginner-friendly stenciling to professional stamping, so you can pick the approach that matches your skill level and budget.
Value Alert: Transform 100 sq ft of concrete to brick-look for under $100 using paint methods, or invest $300-800 for permanent stamped results.
5 Proven Methods to Transform Your Concrete
Here are the most effective techniques, ranked from easiest to most advanced:
- Stencils and brick-colored paint - Perfect for beginners
- Sponge painting technique - Most budget-friendly option
- Rubber or silicone mat stamping - Great balance of ease and results
- Wet concrete stamping - Professional-grade permanent results
- Textured roller application - Best for large areas
Important: The condition and age of your concrete will determine which method works best. Fresh concrete allows for stamping and rolling, while cured concrete is perfect for painting techniques.
Each technique varies in complexity and permanence. Surface painting methods can be completed in a weekend, while stamping requires precise timing with fresh concrete pours.
Time Investment: Stenciling = 4-6 hours, Sponging = 8-12 hours, Stamping = 1-2 days including prep.
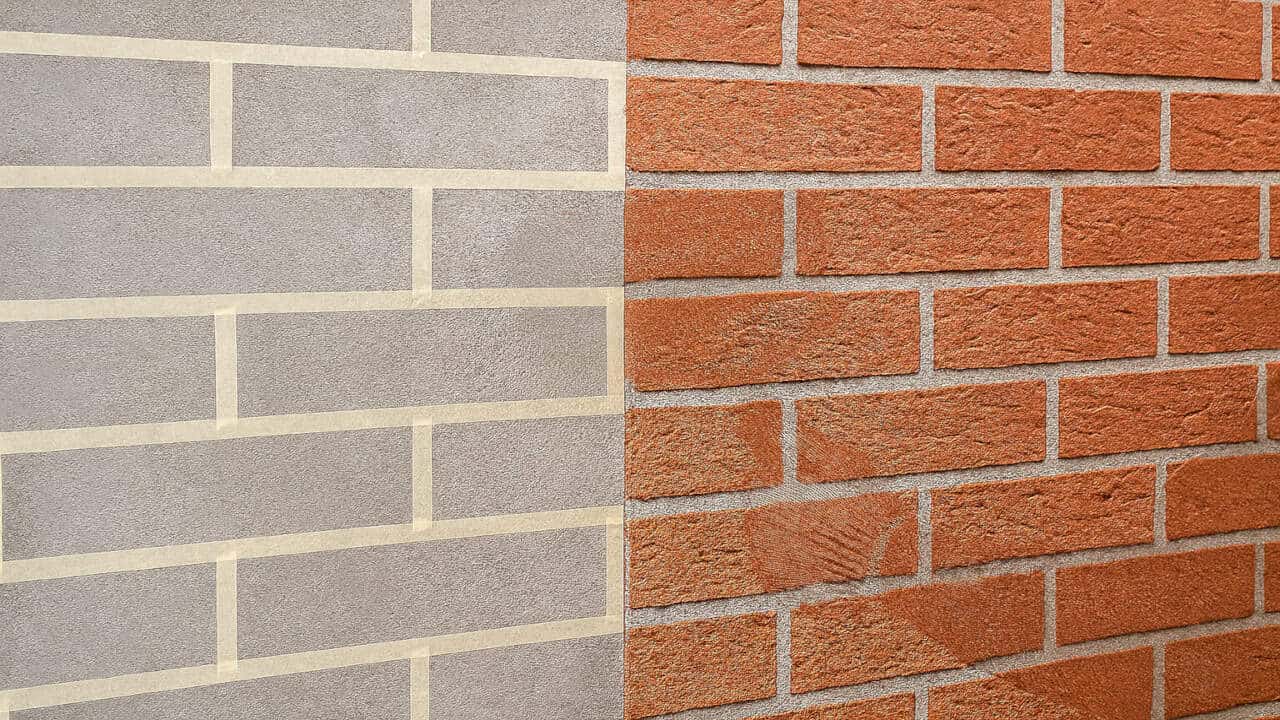
1. Use Stencils and a Preferred Brick-Colored Paint
Stenciling offers the fastest path to brick-look concrete. Most homeowners complete a standard patio in 4-6 hours using this beginner-friendly technique.
Stencils cost $15-50 depending on size and are available at hardware stores or online. Custom brick patterns can be created using cardboard or plastic sheets for unique designs.
Common stencil patterns include running bond, subway tile, and herringbone. Specialty patterns like basket-weave or stack bond require custom cutting or special orders.
Surface preparation involves cleaning, crack filling, and complete drying. Most stencils work on floors, walls, and both interior and exterior surfaces, though reusability varies by material quality.
Here are the essentials you'll need for this DIY project:
- Brick stencils (at least a couple if the size is too small).
- Brick-colored paint (or a combination of colors you want).
- Mortar-colored paint (or two shades of gray, as you prefer).
- Sealant, painter's tape, rollers, brushes, tray, sponge, rag.
Follow this step-by-step process for professional stenciled results:
- Clean concrete thoroughly with degreaser, fill cracks, and let dry completely
- Apply two coats of base paint in mortar color (gray) or primer for smooth finish
- Position stencils using adhesive backing or painter's tape for alignment
- Roll brick-colored paint over stencil openings with consistent pressure
- Remove stencil immediately and reposition for next section
- Touch up edges and corners using partial stencil placement
- Apply clear protective sealant after paint cures for 24 hours
Real bricks vary in color from deep reds to browns and charcoals. Mixing 2-3 complementary shades creates more authentic results than single-color applications.
2. Paint Bricks on a Concrete Surface With a Sponge
Sponge painting costs 40% less than stenciling since you only paint brick areas, not the entire surface. The tradeoff is time - each brick requires individual attention.
Sponges allow complete creative control over brick size, spacing, and layout patterns. Surface preparation follows the same cleaning and priming steps as stenciling.
Execute the sponge painting technique using these key steps:
- Begin at corners or edges to avoid finishing in difficult spots
- Cut sponge to desired brick dimensions (standard is 8" x 2.5")
- Load sponge with paint, removing excess on tray edge
- Press sponge firmly onto surface in chosen pattern with consistent spacing
- Use painter's tape as guides for straight rows if needed
- Complete entire area before making touch-ups
- Apply sealant after 24-hour cure time
Latex paints work best for concrete surfaces, offering durability and easy cleanup. Water-based sealants enhance color depth while providing weather protection.
Advanced designs can incorporate multiple patterns or decorative elements. Consider traditional options like the Spanish bond brick pattern for unique visual interest.
3. Get Rubber or Silicone Mats to Paint on Concrete
Rubber and silicone mats create consistent brick impressions faster than individual sponge work. These textured mats cover 12-24 square feet per application.
Surface preparation follows standard cleaning protocols. Load the textured mat with paint and press firmly onto the base-painted surface for consistent results.
Commercial brick-pattern mats cost $30-80 and are reusable for multiple projects. DIY versions can be made using silicone and brick molds for custom patterns.
Mat sizes range from 12" x 12" for detail work to 24" x 48" for large areas. Use a level when working on vertical surfaces to maintain pattern alignment.
Paint accumulation on the mat reduces the need for frequent reloading, making the process faster as you work through large areas.
Mat Efficiency: One 24"x48" textured mat can cover up to 200 sq ft before needing thorough cleaning.
4. Stamp Concrete Floors With Brick-Patterned Mats
Stamping works exclusively with freshly poured concrete during a narrow 2-4 hour window after finishing but before initial set.
Professional stamping mats differ from paint application mats - they're heavier, more rigid, and designed to compress wet concrete permanently.
Stamped concrete creates permanent texture and pattern that lasts the lifetime of the slab. The process works for any design from brick to cobblestone textures.
Release agents add color while preventing mat adhesion. Powder forms create more subtle coloring, while liquid agents provide more intense hues.
Stamping mats cost $150-400 depending on pattern complexity. Many concrete supply companies offer rental options for occasional use projects.
Additionally, you'll need a few other supplies and essential tools, including the following:
- Release agent, whether powder or liquid.
- Stamp tamper, masonry brush, chisel, grinder, etc.
- A curing agent and sealant for stamped concrete.
Stamping requires 2-3 people working quickly within the narrow timing window. Delays can result in permanent tool marks or incomplete pattern transfer.
Post-stamping cleanup involves waiting 48-72 hours, then washing off release agent residue before any touch-up work.
Proper curing and sealing protects the investment. Apply sealant in multiple light coats rather than one heavy application.
For all the troubles, here's what awesome stamped concrete with brick patterns looks like:
5. Make Concrete Floors Look Like Brick With a Roller
Textured rollers work on the same timing principles as stamping but cover ground faster on large areas like driveways or commercial surfaces.
Rolling creates continuous pattern impressions in one pass, making it ideal for large areas. Liquid release agents work better than powder for roller applications.
Rollers can cover 100-200 square feet per hour compared to 20-40 square feet with stamping mats, making them perfect for large driveways.
Scale Factor: For areas over 500 sq ft, textured rollers become 3-5x more efficient than individual stamping methods.
Here's how a roller typically works on concrete to make it look like brick:
Final Thoughts
Your choice depends on project size, budget, and permanence needs. Small patios under 200 square feet work well with stencils or sponge techniques costing under $100.
Large driveways and permanent installations justify stamping or rolling costs of $300-800 for professional-grade results that last decades.
Start with cleaning and prep work regardless of method - this foundation determines your final results more than any particular technique.
Method Selection Guide
Budget-Friendly: Sponge painting ($50-75). Beginners: Stencils ($75-150). Large Areas: Texture mats ($200-300). Permanent: Stamping ($300-800). Choose based on your budget, skill level, and project size.