How To Pour Concrete Driveway In Sections
Sectional pouring reduces cracking by 70% and allows better concrete control. Master the 6-step process for professional results.
Pouring concrete driveways in sections eliminates the stress and timing pressure of large single pours while dramatically reducing crack formation. This proven method allows you to work at your own pace and achieve professional-quality results.
How to Pour Concrete Driveway in Sections
The process involves planning section layout, excavating and grading, installing formwork with reinforcement, mixing and pouring concrete, finishing the surface, and proper curing with expansion joints.
Sectional pouring offers major advantages: better workability with smaller batches, reduced physical strain, improved timing control, and significantly fewer thermal cracks. Each section cures independently, creating a stronger overall structure.
Professional contractors use this method on large residential driveways because it delivers superior results compared to single-pour attempts that often crack within the first year.
Pro Tip: Sectional pouring allows you to work at your own pace while maintaining concrete quality. Each 100-square-foot section takes about 2-3 hours from mixing to finishing.
Preparing For The Project
Proper preparation determines project success. Clear the area of debris, locate underground utilities, and verify that all materials and tools are ready before starting any concrete work.
Gathering The Necessary Tools And Materials
Essential tools include measuring tape, level, wheelbarrow or mixer, tamps for compaction, saws for cutting forms, and covering materials for curing protection.
Materials needed are Portland cement, sand, gravel aggregate, rebar or fiber reinforcement, and water. Calculate approximately 4 cubic feet of concrete per 100 square feet at 4-inch thickness.
Most supplies are available at building supply centers. Professional concrete suppliers offer better pricing for large quantities and can deliver ready-mix for bigger sections.
Cost Breakdown: Expect $3-5 per square foot for DIY sectional concrete vs. $8-12 for professional installation.
Obtaining Any Necessary Permits Or Permissions
Check local building codes for permit requirements. Most residential driveways need permits if they exceed certain sizes or modify drainage patterns.
Call 811 (Dig Safe) at least 72 hours before excavation to locate underground utilities. This free service prevents costly damage to gas, electric, or water lines.
HOA properties may require architectural review for driveway modifications. Verify contractor licensing and insurance before hiring professional help.
Measuring And Marking The Desired Concrete Driveway Dimensions
Measure and mark the driveway area using stakes and string lines. Use a laser level to establish accurate grade lines and ensure proper drainage slope (minimum 1% grade away from structures).
Divide the project into manageable sections, typically 10x10 feet or 12x12 feet maximum. Smaller sections provide better control and reduce the risk of settling or cracking.
Double-check all measurements before excavation. Accurate layout prevents costly corrections and ensures professional results.
Clearing The Area And Removing Any Obstacles
Remove all debris, vegetation, and obstacles from the work area. Check for tree roots and underground obstructions that could affect the concrete pour.
Trim vegetation that might interfere with work or hinder the curing process. Remove trees within 7 feet to prevent future root damage and cracking.
Excavate 8-12 inches deep, depending on your climate and soil conditions. Level the area and add a 4-inch compacted gravel base for drainage and stability.
Planning The Sections
Strategic section planning ensures professional appearance and long-term durability. Proper layout determines material quantities and helps achieve consistent thickness throughout the project.
Determining The Number And Size Of Sections
Standard residential sections work best at 10x10 feet or 12x12 feet maximum. Consider traffic patterns, soil conditions, and climate when sizing sections.
Minimum thickness is 4 inches for normal use, 6 inches for heavy vehicles. Curved areas require special attention to maintain consistent thickness and proper reinforcement.
Plan expansion joints between sections to accommodate temperature movement and prevent cracking. Proper sectioning reduces thermal stress and improves long-term durability.
Section Size Rule: Never exceed 150 square feet per section. Smaller sections = better control and fewer cracks.
Create Expansion Joints To Prevent Cracks
Expansion joints prevent cracks by absorbing temperature movement and soil shifting. Install 1/4-inch foam strips or flexible materials between each section.
Use construction-grade foam, rubber, or vinyl materials that compress and expand without losing their seal. Proper joint installation is crucial for long-term crack prevention.
Consider drainage when placing joints to prevent water accumulation. Well-designed expansion joints eliminate 90% of temperature-related cracking issues.
Designing The Layout For Each Section
Design each section considering obstacles, drainage requirements, and grade. Use string lines and a laser level to mark accurate boundaries and slopes.
Standard thickness: 4 inches for light use, 6 inches for heavy vehicles. Add reinforcing steel or fibers for extra strength in high-stress areas.
Light-colored concrete reflects heat and stays cooler. Plan section layouts to minimize waste and ensure efficient concrete delivery scheduling.
Marking The Sections On The Ground
Once you have determined the layout for each section of your concrete driveway, it is time to mark the sections on the ground. This can be done by using long strings connected to stakes and running them along the perimeter of each slab.
If your driveway is large or has curved edges, you may need to use a laser level to ensure accuracy when marking off sections.
When laying down the string, pay attention to any obstacles, such as trees, shrubs, and utility poles. You want to ensure your route around these obstacles to prevent potential damage when pouring concrete later.
Additionally, consider the grade of the land and drainage needs when marking off sections to create a smooth surface.
It's also important to measure each section before pouring concrete so that you know exactly how thick each slab will be. Generally, 4 inches is recommended for lighter areas, while 6 inches is ideal for more heavily trafficked sections.
However, if you use reinforcing bars or fibers, thinner slabs may be necessary on larger areas.
Finally, consider using light colors when pouring your concrete driveway to maximize reflectivity and reduce heat absorption from sunlight, thus helping keep your driveway cooler during summer.
Excavation And Grading
Begin excavation after marking boundaries. Remove obstacles and grade for proper drainage (minimum 1% slope away from buildings).
Maintain consistent depth measurements throughout excavation. Proper grading eliminates water pooling and prevents future settling problems.
Excavating The Driveway Area To The Required Depth
Excavate to the required depth: typically 8-10 inches total (4 inches concrete + 4 inches gravel base). Adjust depth based on soil conditions and expected loads.
Create vertical sides and flat bottom surfaces. Remove all stones, roots, and debris that could cause uneven settling or surface defects.
Rent excavation equipment for large projects to ensure uniform depth and save time. Verify measurements before proceeding to formwork installation.
Compacting The Soil And Adding A Gravel Base
Compact the subgrade soil to prevent settling. Use hand tampers for small areas or rent a plate compactor for larger sections to achieve 95% compaction.
Add 4 inches of graded gravel base, using mixed sizes from 3/4 inch down to fines. This provides drainage and a stable foundation for the concrete.
Compact the gravel base in 2-inch lifts to achieve maximum density. Proper base preparation prevents 80% of future settling problems.
Foundation Truth: 90% of concrete failures start with poor base preparation. Spend extra time here to save years of headaches later.
Ensuring Proper Drainage
Ensuring proper drainage is essential when pouring a concrete driveway into sections. Without adequate drainage, water can become trapped underneath the driveway and cause damage to the foundation or create puddles on your driveway.
To ensure good drainage, dig a slight trench along your driveway sections. This will help divert any excess water away from the area and guide it toward other areas where it can be drained properly.
For best results, grade this trench on a slight downward angle away from the driveway so that water flows away naturally.
In addition to digging a trench, install a French drain if necessary. A French drain is a gravel-filled trench with perforated piping at the bottom that helps collect and channel water away from areas prone to standing water or flooding.
This type of drain can be especially helpful for longer driveways with multiple sections, as it can provide additional stability and help redistribute weight evenly across all sections.
It's also important to check your local building codes before beginning your project, as some municipalities may require certain types of drains depending on where you live.
Consulting experts or talking to building inspectors in advance can help ensure all regulations are met and prevent possible delays during construction.
Permit Reality: Most areas require permits for driveways over 600 square feet or those affecting drainage patterns.
Formwork And Reinforcement
Formwork shapes the concrete while reinforcement provides structural strength. Both elements must work together to create durable, crack-resistant sections.
Proper formwork and reinforcement installation determines the final quality and longevity of your concrete driveway.
Installing Formwork For Each Section
Build formwork using 2x4 or 2x6 lumber, depending on slab thickness. Secure forms with stakes every 3-4 feet and brace against concrete pressure.
Ensure forms are level, straight, and properly aligned. Use a string line to check alignment and a level to verify grade accuracy.
Oil or coat forms with release agent for easy removal. Temporary supports prevent bowing under concrete weight during the pour.
Placing Reinforcements Bars Or Wire Mesh For Added Strength
Reinforcement is essential to the concrete driveway pouring process, as it will help strengthen and stabilize your finished product.
Steel bars or wire mesh should be placed in the formwork before pouring to create a stronger bond between the wet concrete and the formwork.
Once placed, these steel bars or wire mesh should be secured with additional nails or screws, and the area should be checked for any gaps that need to be filled before pouring.
Steel reinforcing bars can also be embedded directly into wet concrete as it is poured. These will strengthen needed areas and help keep the driveway level even when it dries. Reinforcing bars can also create a patterned surface for decorative driveways or walkways.
Builders should follow industry standards when placing reinforcement materials within their formwork to ensure optimal results.
The American Society of Civil Engineers recommends that all steel bars and wire mesh be spaced evenly apart at an interval of 2 inches per 10 feet, with a minimum spacing of 4 inches from each side of the formwork walls.
Furthermore, builders should use materials rated to withstand pressure from wet concrete; this may depend on environmental factors such as climate, humidity levels, etc.
Securing Formwork And Reinforcement Properly
Securing formwork and reinforcement properly is essential to ensure a successful pour. The formwork should be secured with wooden stakes, screws, nails, or other appropriate fasteners into the ground.
The formwork walls should also be securely attached to prevent any shifting during the concrete pouring. Additionally, builders should inspect the formwork for gaps before pouring to prevent the wet concrete from escaping.
Reinforcement should also be properly secured before pouring the concrete. Steel bars or wire mesh should be placed within the formwork at an interval of 2 inches per 10 feet, with a minimum spacing of 4 inches from each side of the formwork walls.
Furthermore, builders should use materials rated to withstand pressure from the wet concrete and secure them with additional nails or screws.
All reinforcements must be evenly spaced throughout the driveway to remain level once dry and provide optimal strength.
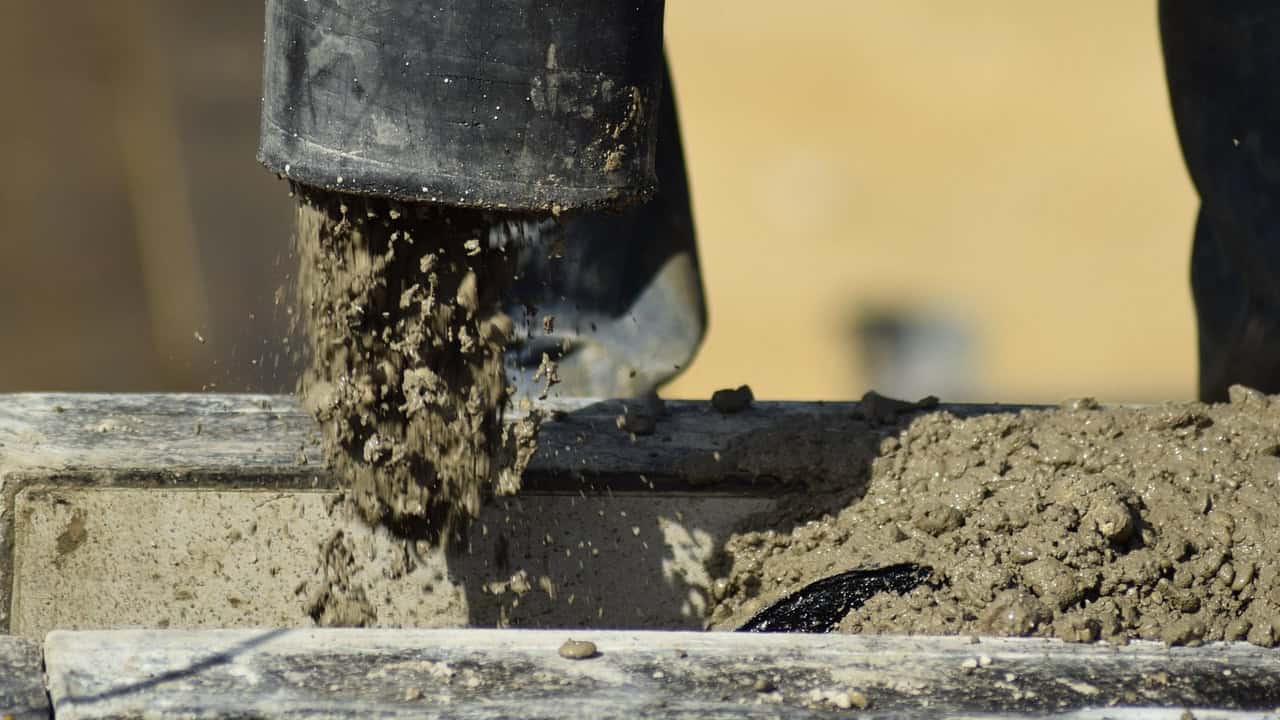
Mixing And Pouring Concrete
Mixing and pouring concrete is an important step to do correctly when constructing a new driveway. Ensuring that the formwork and reinforcement are properly secured before mixing and pouring the concrete is essential.
Calculating The Amount Of Concrete Needed
Calculate concrete volume using length × width × depth (in feet), then convert to cubic yards by dividing by 27. Add 10% extra for waste and corrections.
Example: A 10×12×0.33 foot section needs 1.46 cubic yards. Order ready-mix concrete for sections larger than 2 cubic yards to ensure consistent quality.
Schedule concrete delivery to match your work pace. Small sections can use bagged mix, while larger areas benefit from ready-mix trucks.
Timing is Critical: Fresh concrete has a 90-minute working window. Plan your pour schedule accordingly.
Preparing The Concrete Mix According To Specifications
Once the amount of concrete needed to complete the driveway has been accurately calculated, it is important to prepare the concrete mix according to specifications.
The required cement, sand, and gravel ratio should be followed closely and thoroughly mixed in a wheelbarrow or concrete mixer.
The manufacturer's guidelines should be followed when mixing the concrete, as too much or too little water can affect the strength and quality of the final product.
Too much water in the mix will weaken its tensile strength, whereas too little water will cause cracks due to shrinkage as it dries.
The right consistency is necessary for an even pour with minimal air pockets that could weaken its structure once dry.
Adding special admixtures like plasticizers or accelerators can also help improve the properties of freshly poured concrete but should only be added after consulting a professional.
Furthermore, all measurements must be precise before pouring anything into the formwork. Any excess material will cause uneven surfaces and bulging sides that could affect stability and integrity over time.
Pouring The Concrete Into Each Section
Pour concrete starting at one end of the section, working systematically to avoid cold joints. Use a screed board to level the surface immediately after pouring.
Float the surface to bring cream to the top and eliminate air bubbles. Work edges and corners carefully to ensure complete filling of the forms.
Complete each section within 30 minutes of mixing to maintain workability and prevent setting issues between batches.
Curing the Concrete To Harden Over Time After You Pour
Once all sections have been poured, it is important to cure the concrete to harden properly over time.
This can be done by spraying a curing agent over the freshly poured driveway or covering it with waterproof plastic sheets for several days, depending on the material used.
It is important that curing occurs before any vehicles are driven overtop of the newly laid driveway, as doing so could cause cracks or other structural damage if done too soon.
Additionally, regular maintenance should occur throughout its lifetime to remain sturdy and durable after extended use.
Using Screeds And Floats To Level The Surface
Once the initial concrete has been poured, screeds and floats should be used to level the surface.
Screeds are wooden boards typically used for leveling off the surface of fresh concrete, while floats are metal or wood hand tools used to finish and smooth the surface.
A screed should be dragged across the top of the formwork from one end to the other to create an even layer throughout each section.
This tool should also remove any excess material and create a smoother look.
Floats can help ensure the screed leaves no air pockets and further compacts the material.
These two tools will help create a secure and even base for pouring additional sections on top.
Finally, after all, sections have been poured and finished with these tools, they should be sealed with a sealant to protect them from water damage over time.
Sealers also help create a non-slip surface, providing traction when driving overtop of it.
Finishing Touches
Once the concrete driveway has been leveled, finishing the project with a few finishing touches is important to produce a quality result that looks great.
Smoothing And Compacting The Concrete Surface
Smoothing and compacting the concrete surface is important to successfully pour a concrete driveway in sections.
A trowel can smooth it out after the screed has been used to level out the top layer of the formwork. This tool should be moved vertically over the concrete surface to create an even look.
In addition, hand-held floats made of wood or metal should be used for further compaction and smoothing.
These tools should be rolled around on top of the surface to ensure that any air pockets left behind by the screed are filled in and that all material is evenly compacted down.
This helps create a strong base for subsequent poured sections and ensures a long-term, durable structure.
Once these steps are complete, applying the sealant to protect against water damage and weathering is another important step.
It is also important to add expansion joints between each section of poured concrete, which will help prevent cracking due to temperature changes or shifting soil.
Edging And Jointing The Sections
Once the concrete driveway has been smoothed and compacted, edging and jointing between the sections are important in creating a strong and secure concrete driveway.
Using a special tool called an edger, the edges of each section should be rounded to ensure that no sharp corners remain.
This helps smooth the transition from one section to the next while preventing any potential cracks or weak spots in the concrete.
In addition, expansion joints should be placed between each section as well. These are typically strips of material such as plastic or rubber that are inserted into the wet concrete before it hardens.
These joints help reduce cracking due to weather changes, excess water, or shifting soils.
They also provide a cushion against the pressure that may cause bowing or buckling in certain driveway areas over time.
Adding Decorative Elements If Desired
Adding decorative elements to a concrete driveway is easy to customize and make it stand out.
Numerous options are available, from stamping the concrete with a unique pattern to adding color, texture, and design.
Stamping adds visual interest and texture to the driveway's surface with a pattern of brick or stone designs.
Stamps come in many styles and can be mixed and matched to create custom designs. They can also be used in combination with other colorants for added impact.
Colorants come in various forms, such as powder or liquid, and can be used to add hues to the concrete drive.
This is often done after stamping, but colorants can be applied alone on plain concrete surfaces.
The result is stunning when combined with imprinted patterns, giving depth and character to the entire driveway.
Another option is staining the concrete drive with acrylic-based stains for permanent protection that won't fade over time due to weathering or wear and tear.
These stains are available in different colors, and they penetrate deep into the porous surface of the driveway, providing long-lasting protection against damage caused by UV rays or water absorption.
Finally, decorative accents such as borders or edging can be added along edges or around driveways for an extra touch of style.
These accents come in various materials such as stone, wood, stainless steel, brick, plastic, etc., giving homeowners plenty of options when choosing how they want their driveway to look.
Covering The Concrete To Protect It From Drying Too Quickly
Covering the concrete with a curing compound ensures it dries slowly and evenly, protecting it from premature cracking.
This is done by applying a sealer or curing compound over the newly poured concrete before finishing. The sealer acts as a barrier between the wet surface of the concrete and the air, trapping moisture in the concrete and allowing it to dry slowly.
Different types of sealers are available, and choosing the right one depends on several factors, such as weather conditions, temperature, humidity levels, etc.
Generally speaking, solvent-based acrylic sealers are best for outdoor applications due to their high durability and resistance to weathering.
They also offer UV protection against sun damage. Water-based acrylic sealers are better suited for indoor use because they don't have noxious fumes that can cause breathing issues or headaches.
Applying the curing compound in multiple thin layers instead of one thick layer is important. This helps ensure proper penetration into the pores of the concrete and creates an even application of moisture throughout its entirety.
Working in thin layers reduces bubbling when too much product is applied simultaneously.
Curing compounds should be applied soon after pouring to prevent too much water loss; if left unprotected, excessive drying can lead to shrinkage cracks or spalling (extreme curling at edges).
If edging has been done around the driveway, this could also lead to curling/separation between edges and the main body due to moisture loss in different areas at different rates.
Curing And Maintenance
Curing and maintenance are essential steps in pouring a concrete driveway. Proper curing prevents premature cracking due to excessive drying, while regular maintenance ensures your driveway looks its best for years.
Allowing The Concrete To Cure For The Recommended Time
After the concrete has been poured and the edging is complete, allowing it to cure for the recommended time is important.
This will ensure maximum strength while allowing water molecules in the mix to evaporate completely.
For standard driveway mixes, the curing period should be at least 28 days; some mixes may need a longer period, depending on environmental conditions and usage frequency.
During this curing period, it's important to keep the surface moist by regularly spraying it with water or covering it with wet burlap or plastic sheeting.
Ensure that any covering does not touch or overlap with any other part of the driveway, as this can lead to uneven curing and cracking due to air pockets or moisture pockets forming beneath them.
If left uncovered, the top layer of concrete will dry out faster than deeper layers, which can cause shrinkage cracks and weaken its structure over time.
Keeping your newly poured driveway wet during its curing process is essential for long-term success.
Watering And Covering The Concrete During The Curing Process
It is essential to water and cover the concrete regularly during the curing process. This helps keep the surface moist and prevents excessive drying that can lead to premature cracking.
To ensure uniform curing, it is important to ensure the covering does not overlap with any other part of the driveway.
A slow trickle lightly saturates the surface when wetting the concrete without causing runoff.
Any extra water should be soaked up immediately with a mop or towel. Covering the concrete also helps maintain moisture levels in the top layer so that it cures even with deeper layers.
To cover your driveway, you can use wet burlap or plastic sheeting. Both materials should be laid flat across the surface, ensuring no parts overlap and no air pockets underneath them.
It is also important to check for plants or other debris beneath the covering, as this can cause uneven curing and structure weakening over time.
Finally, monitor your driveway frequently during its curing period.
Sealing The Concrete To Protect It From Stains And Weather Damage
Once the concrete driveway has fully cured, sealing it to protect the surface from weather damage and stains is important.
Sealing the concrete with a quality sealer will help prevent moisture penetration and UV damage and reduce staining caused by dirt, oils, and other contaminants.
Sealing also helps reduce wear and tear caused by de-icing salts and freeze-thaw cycles.
The most common sealant used for driveways is an acrylic-based sealer that penetrates the pores of the concrete, creating a watertight barrier that protects against water and other substances.
Silane or siloxane sealers are better suited for colder climates due to their superior resistance to freeze-thaw cycles. It is best to apply a two-coat system with both types of sealers to ensure maximum protection.
Use even brush strokes across the surface when applying the sealer to ensure proper coverage.
A roller can be used for large flat surfaces or edges, but avoid using a sprayer, as this can leave gaps in coverage. Allow 24 hours between coats for maximum adhesion and drying time before driving on the driveway.
Regular Maintenance To Prolong The Lifespan Of The Driveway
Regular maintenance is key to prolonging the lifespan of your concrete driveway. By keeping up with regular cleaning and sealant applications, you can help ensure your driveway remains in top condition.
Start by regularly sweeping away dirt, debris, leaves, and other particles from the driveway's surface.
This will reduce the amount of wear and tear that accumulates over time. Be sure to pay close attention to any cracks or uneven spots in the concrete where dirt may settle and cause damage.
Use an appropriate cleaner or degreaser to remove oil and other substances from the driveway for deeper cleanings.
Use a pressure washer if necessary, taking care not to use too much pressure, which could cause further damage.
Weeds can be a problem for driveways as well. Keep them at bay by regularly trimming back plants encroaching into your driveway space and applying an appropriate herbicide or weed killer when needed.
Finally, remember to reapply the sealer every 1-2 years depending on climate conditions and use frequency as mentioned above.
You must allow enough time for curing before sealing (typically 90 days) and maintain a consistent temperature until cured (ideally 70 degrees Fahrenheit). Follow your sealer's instructions carefully for the best results.
Conclusion
Sectional concrete pouring delivers professional results while reducing physical demands and material waste. The key to success lies in thorough preparation, accurate measurements, and proper timing.
Focus on quality base preparation, secure formwork, and consistent concrete mixing. Allow proper curing time between sections to achieve maximum strength.
Maintain your investment with regular cleaning and sealer application every 2-3 years. A well-executed sectional driveway will provide decades of reliable service.
🏆 Success Summary
Master sectional pouring with these key points: Plan 10x10 sections, prepare a solid base, use proper formwork, work within timing windows, and cure properly. Your patience will be rewarded with a crack-free driveway that lasts 30+ years.